Showing posts with label shabby tea room. Show all posts

Friday, March 23, 2012

This Little Caterpillar sure is HUNGRY

I've recently been asked to make a few Hungry Caterpillar inspired cupcake toppers and well, you know me, I can't stop there!! I took the challenge one step more and created a whole Birthday party pack of inchworm fun!

Starting with my pennant banner...the Happy Birthday words are separated with a little finger stamped caterpillar perched on a leaf he's already taken a few bites out of!

 here are the toppers, they'll come in red and green

and you can't have a party without invites AND of course a little something to thank all the party guests, matching thank you note cards!

I'm entering my banner over at The Shabby Tea Room, they are looking for a bit of pennant fun!

Sunday, March 18, 2012

Hello Spring


This week at The Shabby Tea Room, they posted the inspiration photo below, along with the theme 'Spring is Near' to drum up some creative inspiration. The rules are to use at least three colors from the picture and use dry embossing...and this is what I came up with.


I used the inside stamp from the center of the frame (normally would be thrown away) to create the checkerboard background pattern. Dry embossing over top of that with the Elegant Lines EF. 


I found this tutorial on Pinterest to make the paper flowers, but after rolling them, I cut 1/2 of the bottoms off, so they would sit lower on my card. I also didn't draw the spiral first, just cut freehand. and then added a bunch of mini glue dots to the bottom of each flower. Hot glue would've worked as well. Hand cut leaves were easy to create with my paper snips and I didn't want them too perfect, which is why I didn't use a punch or die cut to make them.


 SU! products used:

Stamps - Elementary Elegance SAB
Ink - Versa Mark, Island Indigo, Lucky Limeade, Pool Party
Paper - Whisper White, Lucky Limeade DSP, Lucky Limeade, Pool Party DSP, Island Indigo
Punch - Scallop Border
Other - Gold Embossing Powder, mini glue dots

Friday, December 2, 2011

Shabby Winter Tree


Another shabby holiday dual...with the Paper Players sketch and the Shabby Tea Room inspiration photo and color palette (I liked it so much, thought I'd give it another go).


I had planned to add a sentiment but must've gotten side tracked by one of my munchkins or two...thought this would make a lovely winter wedding congratulations card though. 

My tree is heat embossed in Silver and for the extra sparkle, I ran a strip of Sticky Strip across the tree before sprinkling on the Dazzling Diamond Glitter. The little poinsettias also got a bit of bling with three little drops of Dazzling Details on the centers of the flowers. I edged the circle and poinsettia cardstock with a bit of Crumb Cake to help define the lines. The white scrap of tulle was a fab find in my ribbon jar.


SU! products used:
Stamps - Snow Swirled
Ink - Versa Mark, Crumb Cake
Paper - Whisper White, Crumb Cake, Very Vanilla
Other - Dazzling Diamonds Glitter, Dazzling Details

Thursday, December 1, 2011

A Shabby Feathered Christmas


Sweet Stop Sketches has a rather sweet sketch to work with this week, hehe...get it, sweet?! 


which I paired with this inspirational photo and color scheme from The Shabby Tea Room


Brrrrrr.....doesn't that photo make you want to cozy up with mittens, a fur blanket and a picnic basket filled with yummy winter goodies and a thermos filled with hot chocolate and hop aboard a sleigh ride deep in the mountains?! 


I heat embossed my silver peacock feathers first before running the paper through the Big Shot with a snowflake EF. The Very Vanilla got kissed with some Frost White Shimmer Paint to add more sparkle as did my little snowflakes. Every layer was edged with a sponge and Crumb Cake, which gives the card a fun shabby feel. The sentiment is a portion of a stamp from Winter Post. To add a little bit more bling, I used Dazzling Details on the eyes of the feathers.


SU! products used:
Stamps - Winter Post
Paper - Crumb Cake, Whisper White, Very Vanilla
Ink - Versa Mark, Crumb Cake
Punches - 1" and 1-1/4" Circle, Snowflake
Other - Silver Embossing Powder, Dazzling Details

Monday, October 31, 2011

Pinterest inspired Wreath


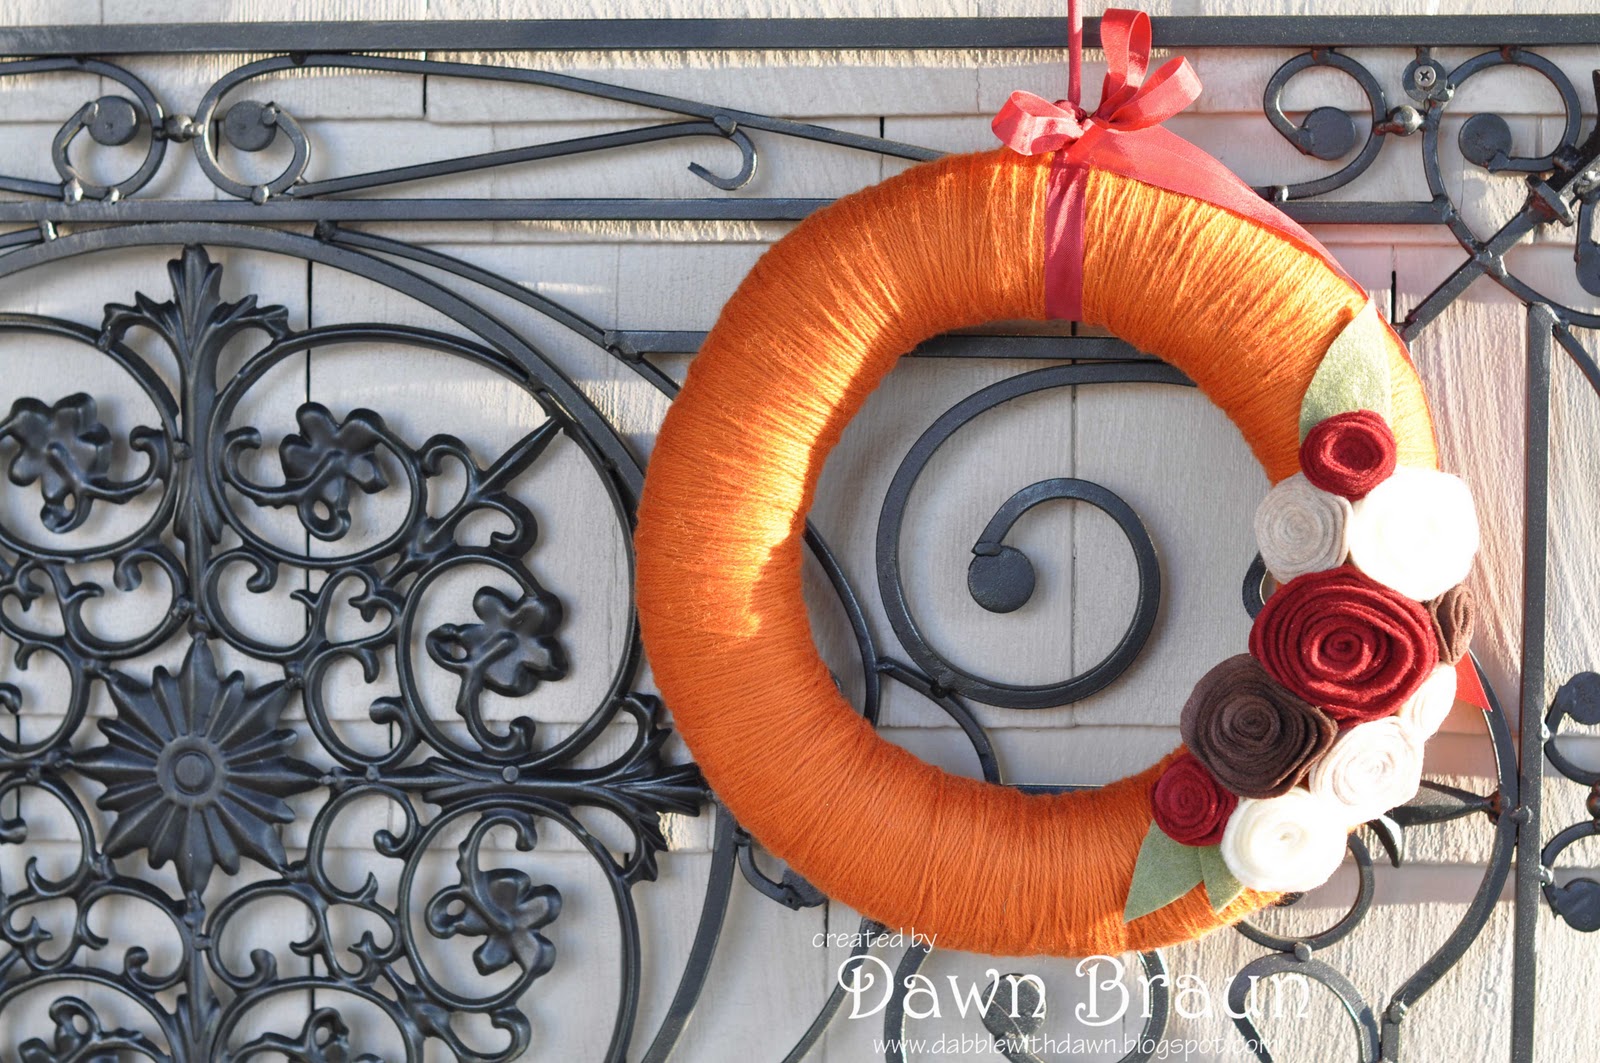
My new obsession with Pinterest has actually caused me to be even MORE productive if you can believe it! I made this sweet yarn wrapped wreath, felt flowers included, by checking out this fab tutorial HERE. Only one blister was had and I LOVE the results, the best part is whenever I see this wreath, I can proudly say, "I made that!" which I've been doing over and over again in my head, hehe...


 (a close up shot of the felt flowers and leaves)


I'm entering my DIY fall colored wreath in the following challenges this week and hopefully I'll inspire others to pull out their own yarn and felt as well!


The Shabby Tea Room
is asking their readers to create a "Homespun Fall" themed project using the above photo as inspiration. I think I took the homeSPUN quite literally since I spun my yarn, around and around and around my wreath!


The Paper Players
are hosting an "Anything Goes" challenge this week and our projects are to contain a fall element.

I've also linked my little wreath over at the Fall Pinterest Challenge at Young House Love and you can check out Sherry's cool Pinterest inspired ornaments, 38, to be exact. Also Katie, Ana & Erin have some awesome projects to check out as well as the rest of the Young House Love followers who have linked all of their lovely creations!


Happy Fall Y'ALL!

Friday, September 9, 2011

Happy 4 U!


The Shabby Tea Room has excellent weekly challenges and I always feel like my cards just aren't shabby enough BUT this time, I feel like this one takes the cake...or at least there's one on my card! (grin)
Pink wedded bliss was the theme, using Pink, Black & any Neutral color, I chose to stick to good old wedding Whisper White. I started by sponging a bit of Regal Rose ink directly onto my Regal Rose cardstock and I did the same with my Basic Black layer, using Craft White. A clean Whisper white, layered with strips of RETIRED ribbon from the Fairy Tale collection. I used Craft Basic Black to stamp the little frame and then heat embossed with Basic Black powder. My little cake I colored directly onto the stamped image with my Regal Rose and Basic Black Stampin' Write markers, cut out my image and then popped it off the framed bit. A bit of SU! basic pearls to add a bit more shabby and viola!


Punch Used: Decorative Label 
Stamp Sets: RETIRED It's the Thought & Four Frames

Thursday, March 17, 2011

Banner of Thanks

 Although these three colors from this weeks Paper Players color pallet scream "baby" to me, I chose to use them for thank you cards instead. The Shabby Tea Room is looking for celebration or birthday themed cards based off the inspirational photo below and since I'm in need of some thank you cards for some very special people in my life who made my bday (week) rock! (oh yeah, the older you get the longer you get to celebrate) I wanted to make them feel as appreciated as I felt loved and celebrate them in return!


I scoured all of my stamp sets for Thank you sentiments and pulled out So Happy for You, Afterthoughts, Because I Care, Happy Moments & the very first stamp set that started my mad obsession, All Natural-retired. Starting with a Very Vanilla base, I ran a piece of Early Espresso through the Big Shot with my Top Note die and then stamped my thank you phrases randomly in Craft White Ink, heat embossing with a 50/50 mixture of heat & stick powder and dazzling diamonds. I tried to stamp in Versa Mark instead of the Craft White but the words just didn't show up like I wanted them to. My little banner was punched out with the Small Oval in Baja Breeze & Blushing Bride and then stamped in Early Espresso with some tiny letters I found in my stamp stash. I folded them in 1/2 over a piece of Very Vanilla 1/8" taffeta ribbon, sticking them together with Sticky Strip, so they wouldn't pop open and then popped my little banner off the card with stampin' dimensionals. Tried my hand at a shabby bow-like flower with some Very Vanilla Seam Binding, topping with a pink flower and a retired Epoxy Brad. One last Thanks, I love being spoiled sentiment stamped onto Baja Breeze and I'm quite happy with my sweet little card!


Friday, March 11, 2011

Good Luck

My birthday treat arrived (a day late) yesterday and sat longingly and patiently, waiting for me to get all three kids snuggled in their beds before I dove in and gently removed each and every fun new punch, pack of paper, stamp set, marker, etc. from their cardboard home to their new home filled with bright cheerful colors, organized shelves, color coded paper & crafting candy filled jars. Still giddy with excitement and totally on a paper high!! Yipee!


Of course I couldn't go to sleep...noooooooo, so I starting making a card at midnight and won't tell you what time I finished and finally scooted my tired eyes off to bed!! Coffee is on the menu for today, for sure. I may even hit up Starbucks! YUM! :)


This weeks Shabby Tea Room is having a 'luck of the Irish' challenge and Hand Stamped Sentiments is "going for the green"...of course that means green, green, GREEN and lots of it and since Card Patterns sketch challenges are made with green, my eye happened to land on that sketch first as I was browsing my printed out inspiration sheets.

I loved how the green layer with the scallop trim looked a bit like a stage curtain, so Go Graduate was quickly pulled out and colored with an array of greens and other fun colors for the students teeny tiny shoes. I used my new Sale A Bration, So Happy For You stamp set that has a little clover and good luck phrase. Stamped the tiny clover in Versa Mark on my Wild Wasabi background. The scallop border is Pear Pizazz. My big clover was made using one of the hearts from the SU! Heart to Heart XL Punch. I curled up the petals a bit and then hand drew a little stem. A bit more green on my little tab held on with a hardware brad and green chunky retired GLITTER!! A piece of basic black that reminds me of a books binding and again as a border around my large clover. No pot of gold here, just a wishful greeting for a lucky teen as they embark on a new chapter in their life! GO GREEN!!


Punches Used: Heart to Heart XL, 3/4" Circle, Word Window, Corner Rounder


Sunday, December 19, 2010

Feel Good FELT

I've recently fallen in LOVE with stiff felt, didn't even know there was such a thing till my friend Kelli introduced me to it. We made these little felt mittens at our November MOPS meeting (Kelli and I are the craft committee) and the ladies loved them. I did too and promised my daughter we'd make some of our own for our holiday gifts. Well, today was the day, the kids and I had fun making our mittens fancy (or just black, those were my sons) and set them aside to dry before attaching the little clothespins. You can attach these little mittens to gifts, goodies, as an ornament on the Christmas tree or even a magnet for the fridge, soooo many options, aren't they FUN?!
When I was browsing this weeks card challenges on line, I stumbled across this cozy pile of fleece at the Shabby Tea Room and knew right away what I wanted to do for my card. The theme is "warm and snuggly" and we are to use either fleece or felt and since I just purchased a plethora of felt, well...felt it is!
(week #40)
I wanted my little mitten to stand out so didn't use any red or green on my card and kept it very simple this week. Simple is good, simple is easy, simple is FABULOUS!! (if I do say so myself) I first drew a mitten on a piece of card board and then cut it out to use as my template. Tracing onto the felt, I cut just inside my marker line and viola', a cute little mitten! 
My background is Chocolate Chip, layered with Kraft, which I fancied up a bit with my new SU! textured impressions framed tulips embossing folder. I punched a bit of the Kraft out with the Word Window punch and then White Heat Embossed my Merry Christmas sentiment (from Teeny Tiny Wishes) inside. After beautifying my mitten, I popped it off the card with large Glue Dots. You could also attach a magnet to the back, so your recipient would have a nice little bit of holiday cheer to display after they open your hand made card.

Wednesday, November 3, 2010

Red, White & Blew?

The inspiration for my card came from this fabulous photo over at The Shabby Tea Room. Doesn't it remind you of a well worn and loved Iowa country farm kitchen? Where the bread is rising under a towel, cookies are  cooling on the counter and Grandma has flour on her cheek from wiping a wisp of hair out of her eyes. If I'm ever feeling down, I can always close my eyes and remember that very picture from my childhood.
The RED, WHITE and BLUE (unlike my title...leave a comment if you actually GET that, haha) were fun to work with and although the first thing that comes to mind when working with those colors is an American flag, I held back on the stripes and instead veered toward gingham. 

I chose this week Sweet Sunday Sketch to work from and started adding layers, color and detail till I was happy with my birthday card. I versa marked a small flower stamp onto my Bashful Blue to add just a hint of "something" to my background. The Scallop Trim Border added a bit of girly flair, not to mention all the red bling. I had fun coloring my little birthday girl, paper pieced her skirt and tried for the very first time, some sparkly fluff. Thought her hat and sweater could use a little cozying up, since the photo just screams COZY KITCHEN!! 
(the glue was still drying on the little sweater when I took this pic)

Thursday, September 23, 2010

A+Monkey

Another creative day with Anne Marie yesterday and although I ONLY finished putting together 2 cards (and started the base of 2 more), I did combine 3 different challenges (quite a feat since there are sooo many wonderful challenges to pick from on the internet)...I really wanted to call this post Monkeying Around or Triathlon Monkey but settled on A+Monkey since that's what totally pops off this card. (Thanks for the fab idea to use chipboard, AM, you're a creative GENIUS!)
First I snagged this sketch from Anne Marie's stack of unbelievably OCD post it notes (and I say that with MUCH love since I too am on the OCD side, lol), where she jotted down this weeks The Paper Players challenge.
PP16

Next I combined the colors from the SCS Color Challenge
Baja Breeze, Wild Wasabi & Cajun Craze
CC289

and last I paired it with the following inspirational photo challenge from The Shabby Tea Room
TSTR28 "School Days"

Gracious, THAT was a mouthful!! After coloring my sweet little monkeys, I punched them out using the 1-3/4" Circle XL & 1-3/8" Circle. Placed my background of RETIRED "Hand Drawn" DSP, some RETIRED Baja Breeze ribbon & a raw "A" from my SU! chipboard stash, with Cajun Craze sponged onto it and a sentiment stamped in Black Staz On and ba da bing ba da boom...a Thank You card, which I'm sure will come in handy for one of my daughters teachers!