Monday, December 22, 2008

December SWAPS

I got this GREAT idea from HERE. Sorry for all the NON-DAWN material but I usually take a bit and run wild (like the micro beads, fun fun!) with the rest, Enjoy!! 
 Demo Swap
and here are the wonderful projects the ladies made, super cute!!!

products used on snowflake card: All products are SU!
Kraft, Old Olive & Whisper White Card Stock, Holiday Treasures DSP, Sticky Strip, Micro Beads, Scallop Circle Punch, 1-3/8" Circle Punch, Baja Breeze Classic Stamp Pad, Versa Mark, Clear Emboss Powder, Riding Hood Red Ribbon and the snowflake is from Best Wishes And More.

Friday, December 19, 2008

3-D Tree

O Christmas Tree, O Christmas Tree, how lovely are your BRANCHES?? Now HOW did you do that??? (you say)...well, again, I was a SNATCHER!!! OOPS! :) I LOVE the Internet, not only because you can connect with old friends and stay connected to everyone else but also because you can find REALLY GREAT ideas like THIS! 

The BEST part is, YES, it folds flat and can be MAILED, woohoo!! 
Now just get your bone folders ready and brush up on your folding skills...

What I used: My NEW favorite green...Always Artichoke, Ruby Red & Very Vanilla Card Stock. The tree is Always Artichoke DSP from the Patterns Pack level 1 Hostess Gift (in the front of the Fall/Winter 2008 Idea Book and Catalog, sorry ladies you can't buy this, you can only earn it!-I didn't have any other green DSP at the time when I was trying to create this). Corner Rounder Punch, Large Oval Punch, Versa Mark, Always Artichoke Classic Ink, 5/8" Chocolate Chip Grosgrain Ribbon & Hologram Highlight Stampin' Emboss Powder (AGAIN, I'm sorry, this is RETIRED and I didn't realize that until we were trying to look for it in the catalog, oops!) The saying is from the level 1 hostess stamp set, Best Yet.

I can't find the blog that had the instructions, so I guess I'll have to TRY to walk you through the folding part-this is where a video would come in HANDY! 

For the tree, you'll need 3 different sized squares
3 x 3", 2-1/2 x 2-1/2" & 1-1/2" x 1-1/2"
 Now fold each square in 1/2, open and fold the other way in 1/2, creating a + crease line
 
 Open and fold each square into a triangle, corner to corner and again on the other side, it'll look like you've creased a plus sign and an X, which equals 8 creases
 holding the square in your hands, pull the horizontal creases in towards the middle and press down, you'll have created a triangle
 now fold one side of the top of your triangle in towards the center crease
 and again with the other side and you'll have this...a section of your tree
I put my ribbon down first for the trunk and then layered the tree starting with the top...just slip a small section of the lower 'branches' into the upper pieces and viola, a pretty little poppin' tree!!! Give it a try, let's see what you come up with!

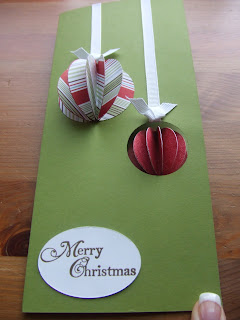
3-D Ornaments


Items used to create: Old Olive & Whisper White Card stock, Holiday Treasures DSP. 1/4" Whisper White Grosgrain Ribbon. The saying is from: Holidays and Wishes Stamp Set. Versa Mark, 1-3/8" Circle, 1-1/4" Circle, 1-3/4" Circle & Wide Oval Punches...PLUS, Gold Stampin' Emboss Powder.

I scored a FULL sheet of 8-1/2" x 11" Old Olive Card stock at 3-1/2" & 7-1/4", folded it into a tri-fold card and then punched a hole with the 1-3/8" Circle Punch (where ever you want your smaller ornament to hang on the front fold). Then with the 1-1/4" Circle punch, I punched out 6 RED circles. Also punched out 6 circles with the 1-3/4" punch. Fold your circles in 1/2 and using snail adhesive, stack them on top of each other (folded up) and then voila, when you open it up a bit and it unfolds into 1/2 an ornament (adhere to your card stock after you adhere your ribbon with Snail). You could also made another 1/2 and make paper ornaments for your tree! Email me your creations, I'd LOVE to post them!!!

How 2

Make a BOW!! I said I'd post the instructions by the end of the week and I'm cutting it pretty darn close being that it's 9:30 pm on Friday! Whew!
I actually SNATCHED the idea (dare I say) from HERE. I was in the midst of wrapping presents, trying to get boxes mailed out, creating card #2 and the idea of our Christmas cards looming nearby when Christina came to my rescue and said the 3rd club project should be bows! (I think she got a hug and an I LOVE YOU, from that one, ha! Thanks Christina!!)

I used Stampin' Up! DSP (Designer Series Paper) in Pacific Point, Pop Up Glue Dots, SU! Vintage Brads (it doesn't matter what color you use though since you won't see them), Snail Adhesive and my handy dandy SU! Tabletop Paper Cutter (which is one of THE BEST purchases I've EVER made!)

You'll need 8 strips of 1" x 6", 4 strips of 1" x 5" and 1 strip of 1" x 4". (Click HERE for visuals and more instructions)