Monday, December 22, 2008

December SWAPS

I got this GREAT idea from HERE. Sorry for all the NON-DAWN material but I usually take a bit and run wild (like the micro beads, fun fun!) with the rest, Enjoy!! 
 Demo Swap
and here are the wonderful projects the ladies made, super cute!!!

products used on snowflake card: All products are SU!
Kraft, Old Olive & Whisper White Card Stock, Holiday Treasures DSP, Sticky Strip, Micro Beads, Scallop Circle Punch, 1-3/8" Circle Punch, Baja Breeze Classic Stamp Pad, Versa Mark, Clear Emboss Powder, Riding Hood Red Ribbon and the snowflake is from Best Wishes And More.

Friday, December 19, 2008

3-D Tree

O Christmas Tree, O Christmas Tree, how lovely are your BRANCHES?? Now HOW did you do that??? (you say)...well, again, I was a SNATCHER!!! OOPS! :) I LOVE the Internet, not only because you can connect with old friends and stay connected to everyone else but also because you can find REALLY GREAT ideas like THIS! 

The BEST part is, YES, it folds flat and can be MAILED, woohoo!! 
Now just get your bone folders ready and brush up on your folding skills...

What I used: My NEW favorite green...Always Artichoke, Ruby Red & Very Vanilla Card Stock. The tree is Always Artichoke DSP from the Patterns Pack level 1 Hostess Gift (in the front of the Fall/Winter 2008 Idea Book and Catalog, sorry ladies you can't buy this, you can only earn it!-I didn't have any other green DSP at the time when I was trying to create this). Corner Rounder Punch, Large Oval Punch, Versa Mark, Always Artichoke Classic Ink, 5/8" Chocolate Chip Grosgrain Ribbon & Hologram Highlight Stampin' Emboss Powder (AGAIN, I'm sorry, this is RETIRED and I didn't realize that until we were trying to look for it in the catalog, oops!) The saying is from the level 1 hostess stamp set, Best Yet.

I can't find the blog that had the instructions, so I guess I'll have to TRY to walk you through the folding part-this is where a video would come in HANDY! 

For the tree, you'll need 3 different sized squares
3 x 3", 2-1/2 x 2-1/2" & 1-1/2" x 1-1/2"
 Now fold each square in 1/2, open and fold the other way in 1/2, creating a + crease line
 
 Open and fold each square into a triangle, corner to corner and again on the other side, it'll look like you've creased a plus sign and an X, which equals 8 creases
 holding the square in your hands, pull the horizontal creases in towards the middle and press down, you'll have created a triangle
 now fold one side of the top of your triangle in towards the center crease
 and again with the other side and you'll have this...a section of your tree
I put my ribbon down first for the trunk and then layered the tree starting with the top...just slip a small section of the lower 'branches' into the upper pieces and viola, a pretty little poppin' tree!!! Give it a try, let's see what you come up with!

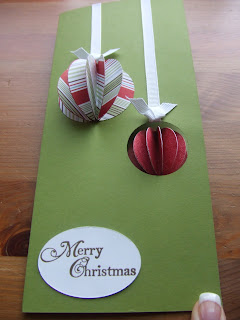
3-D Ornaments


Items used to create: Old Olive & Whisper White Card stock, Holiday Treasures DSP. 1/4" Whisper White Grosgrain Ribbon. The saying is from: Holidays and Wishes Stamp Set. Versa Mark, 1-3/8" Circle, 1-1/4" Circle, 1-3/4" Circle & Wide Oval Punches...PLUS, Gold Stampin' Emboss Powder.

I scored a FULL sheet of 8-1/2" x 11" Old Olive Card stock at 3-1/2" & 7-1/4", folded it into a tri-fold card and then punched a hole with the 1-3/8" Circle Punch (where ever you want your smaller ornament to hang on the front fold). Then with the 1-1/4" Circle punch, I punched out 6 RED circles. Also punched out 6 circles with the 1-3/4" punch. Fold your circles in 1/2 and using snail adhesive, stack them on top of each other (folded up) and then voila, when you open it up a bit and it unfolds into 1/2 an ornament (adhere to your card stock after you adhere your ribbon with Snail). You could also made another 1/2 and make paper ornaments for your tree! Email me your creations, I'd LOVE to post them!!!

How 2

Make a BOW!! I said I'd post the instructions by the end of the week and I'm cutting it pretty darn close being that it's 9:30 pm on Friday! Whew!
I actually SNATCHED the idea (dare I say) from HERE. I was in the midst of wrapping presents, trying to get boxes mailed out, creating card #2 and the idea of our Christmas cards looming nearby when Christina came to my rescue and said the 3rd club project should be bows! (I think she got a hug and an I LOVE YOU, from that one, ha! Thanks Christina!!)

I used Stampin' Up! DSP (Designer Series Paper) in Pacific Point, Pop Up Glue Dots, SU! Vintage Brads (it doesn't matter what color you use though since you won't see them), Snail Adhesive and my handy dandy SU! Tabletop Paper Cutter (which is one of THE BEST purchases I've EVER made!)

You'll need 8 strips of 1" x 6", 4 strips of 1" x 5" and 1 strip of 1" x 4". (Click HERE for visuals and more instructions)

Thursday, November 27, 2008

Happy Thanksgiving!!!

We have SO very much to be Thankful for this holiday season. But it's the simple things in life we all don't realize could make such a big impact on another person's life. Clothes, Food, A Roof over our heads, Warm Blankets, Shoes, Water...these are the things I am thankful for along with my Dear Husband (who provides so much for our family and who loves me for ME), My Children (who make me laugh and cover me with love and snuggles daily), My Friends (Near and Far, who make me a better person, listen when I need to chat, make me laugh from my gut and cheer me up on blue days), My Family (whom I have been able to grow closer to the older I get and who knows my most embarrassing secrets).

I am thankful for all the MEN & WOMEN who are away from their families fighting to KEEP our country FREE so that we can be with our Families over yet another holiday season, THANK YOU from the BOTTOM of my HEART!!!

I am thankful for my Grandparents, they made such an impact on my life and continue to do so from heaven-I miss them terribly...

I am thankful for my creative outlet of Stamping and Scrapbooking...my ever growing hobby allows me an outlet to be ME and to be CREATIVE, which helps one to NOT go insane, ha!

I am thankful for our two furry girls, Satine & Kowe, they have blessed our family with so much unconditional love, tail wags, licks and warm snuggles.

I am thankful for my Health and the health of my loved ones...AND I am SO very THANKFUL that Christian and Nie Nie could be with their families this holiday!

What are you Thankful for this holiday season??? When you are all enjoying your turkeys, families and friends around the table...don't forget to say at least ONE thing you are Thankful for today! God Bless!!!


Wednesday, November 26, 2008

Tuesday, November 25, 2008

SU! Holiday Extravaganza Event

GET READY, GET SET! Stampin' Up!'s Holiday Extravaganza Sale kicks off Nov 26th and ends Dec. 1st. Avoid the crowds and shop on-line here (wearing your jammies and fuzzy slippers). Better yet, you'll be able to purchase select Stampin' Up! product bundles on-line at a fraction of the retail price (20 to 50% off)-quantities will be limited!

TIP: I have personalized gift certificates available too.

STAY TUNED for sales and product details as soon as they are released and FUN holiday ideas!!!

Thursday, November 13, 2008

SU! in San Antonio

Dawn & Shelli Gardner (she just so happens to have my maiden name!)
 

Stampin' Up!'s design team-who we sat right next to

Dawn & Christina

Christina, Dawn, Marlene, Shelli & Becky

October 25th, Stampin' Up! was in downtown San Antonio with a regional seminar and when I heard that, I just HAD to sign up...of course NOT before calling up my neighbor, Christina and begging her to go with me! I asked the rest of my Club members and Becky & Marlene were both able to attend as well. I had a BLAST!!! We all got to meet Shelli Gardner, CEO of SU! and our day was filled with fun, ideas, projects, test driving the NEW Big Shot and of course STAMPING! My mind is reeling with all of the cool projects and techniques that I can't wait to try out! We're already planning our get away to Utah in August for the BIG Convention, which Shelli described as "regionals on steroids".

Sunday, November 2, 2008

November SWAP

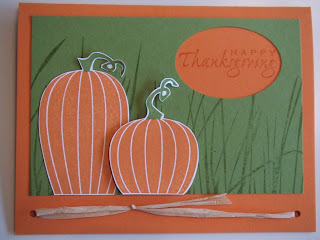
My SWAP this month...used my RETIRED Carved & Candlelit Stamp set w/ the grass from Inspired By Nature. Thought it turned out pretty cute!
Here are 4 of the ladies SWAP cards-only 1/2 of us were able to meet this month.

Club Candy


Real Red, Old Olive, Holiday Treasure DSP, Silver Hodgepodge Hardware, Winter Post Stamp set, Scallop Circle Punch, 1 3/8" Circle Punch, Small & Large Tag Punch, Designer Label Punch, 1/16" Circle Punch, Small Cellophane Bags and Viola', a gift for my ladies!

Tuesday, October 21, 2008

Boo

I made our next Club SWAP cards...and then figured out that we'll be meeting AFTER Halloween, oops! Oh well, I popped them in the mail instead for friends and will be working on another idea before the 2nd of November!
SU! products used: Whisper White & Basic Black card stock, Kiwi Kiss card stock & Classic ink, Pumpkin Pie card stock & Classic ink, Basic Black craft & classic ink, Black Stampin' Emboss Powder (for the witch), blender pen, Summer Sun classic ink (for the moon), Round Tab punch, Wide Oval, Word Window & Horizontal Slot punch (for the cauldron). The pumpkin is from Eat, Drink & Be Scary. The smoke is from Like It A Latte (retired). The cat is from Party Punch (retired).

Non SU! products: Googly eyes, Witch stamp is from Katie & Co-G Studios, Boo is Sizzix Sizzlits Bounce Font.

Sunday, October 12, 2008

Stamp-A-Stack Part 1

20 cards $25 - 5 each of 4 different designs - getting an early start on Christmas cards - PRICELESS!!!

Baja Breeze, Pacific Point, Whisper White & Glossy card stock
Pacific Point striped ribbon
Snowflake (from Winter Post set) stamped onto Glossy card stock with Versa Mark
next Baja Breeze ink refill brayered onto Glossy card stock then buffed to a shine again with Swiffer dry cloth
A Very Merry Christmas (from hostess set Punches Three) stamped with Baja Breeze & Pacific Point Classic Stampin' Pads
Square Scallop Punch
MERRY cut out and popped up with Dimensionals
A Tree For All Seasons stamp set
Bashful Blue, Not Quite Navy & Whisper White card stock
Real Red 5/8" Grosgrain Ribbon
Season's Greetings (from Snow Swirled stamp set) stamped in Not Quite Navy
Wide Oval Punch - edged in Real Red
Winter tree was Versa Marked and then applied with Glassy Glaze Enamel twice using a Heat Tool
Trees are stamped in Black Staz On and then colored in with a blender pen using
Real Red, Garden Green, Pumpkin Pie, Close To Cocoa, Summer Sun, Ballet Blue, Regal Rose & Not Quite Navy
1 1/4" & 1 3/8" inch Square Punches used also


Kraft, Chocolate Chip, Ruby Red, Old Olive, Baja Breeze & Holiday Treasures DSP card stock
Skaters (from Winter Post stamp set) stamped in Chocolate Chip
Ticket Corner & Wide Oval Punch used
Season's Greetings (from Snow Swirled stamp set)
Dimensionals
stamped in Ruby Red
Natural Hemp Twine
1/16" circle punch used on seam of card to thread twine through
Holiday Treasures DSP (Designer Series Paper), Old Olive, Whister White & Riding Hood Red card stock
Riding Hood Red striped Ribbon
Tree (from Snow Swirled stamp set)
Merry Christmas (from Holidays and Wishes stamp set)
Wide Oval Punch
Dimensionals
Old Olive Classic ink, Versa Mark, Heat and Stick Powder & Dazzling Diamonds Glitter
All products are SU! except the Swiffer :)

Tuesday, October 7, 2008

Card SWAP

So, I still need to come up with some snazzy names...SWAP, for starters. Any idea's? The only thing I can think of is Stamp With A Pal (boring!). Here are the ladies cards that we passed out at the beginning of our Club meeting, aren't they great? 

Ladies

Here are my fabulous CREATIVE club members.
This year is going to be so FUN, can't wait!
(sorry the lighting is so bad, windows!)

Monday, October 6, 2008

Club Candy


I put these together for my Stamp Club members. 

SU! Cellophane Bags/Small
A strip of More Mustard card stock folded in 1/2
Ordinary staples to hold everything together
An inch wide strip of Autumn Vine Designer Paper from the holiday mini
(I edged the sides of the paper with my scissors to give it the soft frayed look then folded up one corner of the paper)
Used my Sage Shadow Stampin' Write marked to color (directly onto the stamp) the pumpkin from the Eat, Drink & Be Scary stamp set (which can ALSO be found in the holiday mini) and stamped it onto Sage Shadow card stock.
Used my 1" Circle Punch. (and edged my circle) 
Popped it off of the paper with a Stampin' Dimensional
and finished off the treat bag with a RETIRED 'swirly thing' from my Hodgepodge Hardware and a knot of Chocolate Chip 5/8" Grosgrain Ribbon.
And don't forget the CANDY!!!

Saturday, October 4, 2008

Progressive Page

This page started as a 6X6 Whisper White with 3.5 X 3.5 Pumpkin Pie mat. The photo is cropped to 3X3. I used a straight edge ruler to draw the lines of my spiderweb with a Basic Black stampin' write marker and then attached the lines free-hand to finish off the web. Using the paper-piercing tool & pad from my Crafters' Tool Kit, I added tiny holes to the web. I cut a 3.5 X 1 inch piece of Basic Black card stock and used the SU! Scallop Edge punch up one side of it, attaching to the back of the Pumpkin Pie mat. One Kiwi Kiss tab, using the SU! Round Tab punch. The hat was inked in Kiwi Kiss and the little spiders were as well as Basic Black. I then used a small piece of the Kiwi Kiss/Very Vanilla double sided satin ribbon and attached it to the hat (adhesive works best and doesn't soak through the ribbon like glue). Stampin' Dimensionals were used to adhere the hat to Basic Black card stock which I free handed an outline of with my Paper Snips. Then a bit of steady cutting of the spiders and I adhered those to the page as well, some are popped up with Dimensionals.
and here's how to progressively expand your 6X6 page...

I started out with 12X12 Basic Black card stock, a strip of Pumpkin Pie (from my scrap box) which I punched 3 holes in with my NEW Crop-A-Dile (you can use a regular hole punch but I wanted to try out my CropADile, LOVE it!) I then punched out a piece of Kiwi Kiss with my Word Window punch and adhered it behind the holes. The cauldren was made using 3 punches, Wide Oval, Word Window & Horizontal Slot. Kiwi Kiss & Pumpkin Pie triangles were made with the 1 1/4" Square punch and then cut in 1/2 diagonally. The tag was inked in Kiwi Kiss and before I stamped it onto Whisper White, I colored over the spider with my Basic Black Stampin' write marker, huffed and then stamped. (Huffing is when you breathe on an inked stamp to re-wet the image before stamping) After backing the tag with the Lg. Tag punch in Pumpkin Pie, I punched a hole for my black elastic thread using the 1/16" circle punch and popped it off the page with Dimensionals. The lower left photo was backed in Kiwi Kiss and I mimicked the Basic Black Scallop Edge to pull the 6X6 and 12X12 together. The number 2's are Sizzix Fun Serif. Cute was made with the Sizzix Sizzlits Bounce font. The white spook letters are Making Memories. And I added a few more spiders to finish off the page. All stamped images are from the Eat, Drink & Be Scary SU! set and can be found in the Holiday Mini catalog
(The swirl above the cauldren is RETIRED and was from the Like it a Latte set and inked in Craft White)
Put it all together and viola! A fun 12X12 scrapbook page!!